

ADIT SLPT vs Hilti HSL4: Which Dynamic Anchor Is Better?
12 בJuly 2026
ADIT TFE vs Würth W-BS: Which Concrete Screw Is Better?
12 בJuly 2026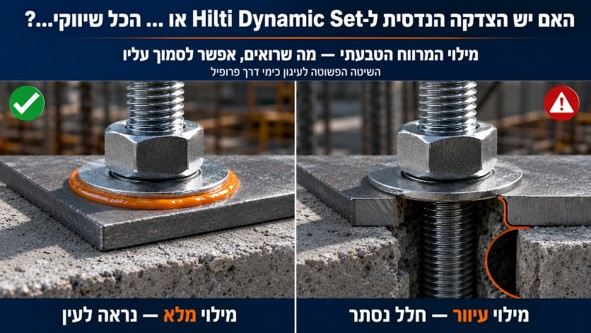
Filling the Annular Gap in Through-Profile Chemical Anchoring
The simple, reliable and visually verifiable way to fill the gap — using the anchor’s own adhesive, with no dedicated kit. Is a Hilti Dynamic Set really justified, or is it mostly marketing?
In short
When a chemical anchor is installed through a profile or base plate, a small ring of empty space — the annular gap — is left between the rod and the wall of the clearance hole in the fixture. That gap has to be filled so that, under shear, all the anchors in a group engage together instead of a few carrying everything. A dedicated filling kit such as the Dynamic Set is one way to do it — but it is not the only way, and rarely the necessary one: the anchor’s own adhesive fills the gap anyway, and doing it in the “open” way (so a visible ring of adhesive appears around the rod) is actually easier to quality-control. Reserve an approved kit for cases where the specification or ETA explicitly calls for a specific approved assembly.
1. What the annular gap is, and why it must be filled
When an anchor is installed through a hole in a profile, that hole is deliberately made larger than the rod so the fixture can be positioned and assembled. The difference leaves a ring of void around the rod. While the gap is unfilled the connection is not “rigid”: under shear the fixture slides a little until it bears against the anchors nearest the load direction — and only those anchors actually carry the shear.
In an anchor group this is a real problem. Instead of every anchor sharing the load, some stay “idle” until the gap closes, and the force concentrates in a few. The European design standards for anchoring in concrete (EN 1992-4) therefore require the gap to be filled with a material of adequate compressive strength if the group is to be designed as acting together — otherwise the connection has to be treated as a hole-clearance case with reduced shear behaviour.
2. What is the default method for filling the gap?
The logical default in chemical anchoring is simply injection filling: the same adhesive that bonds the anchor is also used to fill the annular gap. There is nothing exotic about it — it is the general, sensible baseline. Everything else is a variation on how that filling is carried out, not on what fills the gap.
The “Dynamic Set” kit — the single-supplier exception
A dedicated kit (a filling disc, a spherical washer and a lock nut, into which the same adhesive is injected) achieves the same engineering result — a filled gap — but adds cost and a more exacting installation, and, crucially, makes the filling harder to inspect (see Section 3).
The kit is promoted hard, and mainly by one dominant supplier (Hilti). In its design software (Profis), every time you tick “filling of holes” or use the SOFA method (shear distributed over all the anchors), the software puts the filling kit in as the default and even adds it automatically to the accessory list. For accuracy, though, the software’s own report states that the gap may be filled with a material of sufficient compressive strength — for example with the Hilti filling set — or by any other suitable means. Even the manufacturer, then, concedes that this is not an exclusive solution. Three points are worth setting straight:
- The filling material is identical. With the kit too, the gap ends up filled with the same injected chemical adhesive. The difference is not in the material but in how the filling is carried out and how well it can be checked.
- Filling discs are, by origin, an accessory for mechanical anchors. They are needed mainly with concrete screws and expansion anchors, where there is no adhesive in the hole and the filling has to be injected as a separate operation. With a chemical anchor the filling is already done by the anchor’s own adhesive.
- In chemical anchoring the kit is redundant in practice. It adds a hardware component without changing what fills the gap — and, above all, it makes the filling harder to verify visually (see Section 3).
In other words, Adit’s method is not an Adit “invention”: it is the general injection-filling method, the logical default in chemical anchoring, presented in a convenient, efficient and inspectable form. The dedicated kit — and especially the habit of treating it as almost mandatory for chemical anchoring — is the exception that promotes a single supplier.
In mechanical anchors too — the same principle, simply
Even with mechanical anchors (concrete screws, expansion anchors), where there is no adhesive in the hole, the annular gap can be filled the simple way: inject chemical adhesive into the gap and push it in with a washer, and you get a filled gap exactly as a Dynamic Set would provide. The difference is not in the engineering result but in how it is done:
- Dynamic Set kit: an “elegant”, tidy solution (disc + cannula + spherical washer) — but with a more complex, more exacting installation, and more expensive.
- Direct injection filling: less “elegant” in form, but simpler, cheaper, and achieving the same result — a filled gap and shear shared across all the anchors.
3. The problem: “blind” filling that is hard to inspect
In the kit method the adhesive is injected into a relatively closed cavity. That creates several quality-control weak points:
- You cannot see the adhesive as it is injected — it is hard to know whether the gap filled all the way round or only on one side.
- If the rod is off-centre and pressed against one wall, it can block the flow path and prevent complete filling.
- Air pockets (voids) can form inside the ring without being visible from outside.
- The site inspector has no simple visual sign that the work was done correctly — the check rests on trust alone.
The result: even when an approved component is used, the actual quality of the fill cannot be verified by eye — and that is precisely the critical point, because the entire value of the fill depends on the ring being completely full.
4. Adit’s recommended method: “open”, visible filling through the adhesive itself
This is simply the general injection-filling method, executed in a way that is easy to carry out and to check. It achieves exactly the same engineering aim — a fully filled annular gap — but in a way you can see and verify, using the anchor’s own chemical adhesive and no extra dedicated parts:
- Install directly through the profile. Drill and clean the hole through the clearance hole in the profile. If the connection is not on the floor (a wall or soffit), fix the profile temporarily with temporary concrete screws to hold its position until the adhesive has cured.
- Inject a little more adhesive than needed. Fill the hole with a controlled but slightly generous amount of adhesive, so material is available to rise into the annular gap as well.
- Insert the rod. As the rod goes into the adhesive, the excess is pushed upward and rises through the annular gap between the rod and the wall of the clearance hole, emerging at the surface as a visible ring.
- Press gently with a wide washer. Place a wide washer and a nut, and gently push the protruding adhesive to make sure it is fully seated in the gap. A visible ring of adhesive remains at the edge of the washer — and that ring is the proof of filling.
5. Why the open method is better — the advantages
- Visual quality control. You can see with your own eyes that the adhesive has risen all the way around — proof of filling for contractor and inspector alike.
- High filling certainty. The flow path is open and visible; far less chance of air pockets or a one-sided partial fill.
- One material, one action. You use the chemical adhesive that is already in the hole — no separate kit, disc, spherical washer or dedicated nut.
- No diameter matching or stock. The same adhesive suits every diameter; there is no need to order and match a kit to each rod size.
- Ample compressive strength anyway. The compressive strength of chemical anchoring adhesives is far above the threshold required of a gap-filling material — same material, same quality.
- Direct through-profile installation. Suited to fixing a profile or base plate in one continuous operation, including temporary fixing on walls and soffits.
6. Comparison table
| Criterion | Injection filling — the general method (Adit) | Dynamic Set kit (single supplier) |
|---|---|---|
| Gap-filling material | The anchor’s chemical adhesive | The same chemical adhesive (injected into the kit) |
| Visual quality control | ✓ Visible ring of adhesive around the rod | ✗ Fill inside a closed cavity |
| Certainty of complete fill | High — open, visible flow path | Depends on rod centring; a sealed void can remain |
| Components required | Adhesive + wide washer | Filling disc, spherical washer, lock nut |
| Diameter matching / stock | None — same adhesive for all diameters | A kit must be matched to each diameter |
| Compressive strength of the material | Adhesive strength far above what is required | Identical (same adhesive) |
| Installation through the profile | ✓ Direct | ✓ |
7. Engineering notes and quality control
- Clean the hole. As in any chemical anchoring, thorough hole cleaning (blowing/brushing to the manufacturer’s instructions) is a precondition for anchor strength.
- Full perimeter fill. Confirm the adhesive rises all the way around, not just on one side; if it does not, add adhesive and press again.
- A wide, suitable washer. Use a washer of adequate diameter and thickness so it covers the gap and provides a proper bearing surface under the nut.
- Cure time. Do not load the connection before the adhesive has fully cured, per the manufacturer’s cure-time and temperature table.
- Design compliance. What the standards (such as EN 1992-4) require is a complete fill of the gap with a material of adequate compressive strength — and the open method meets that, verifiably. In applications explicitly designed for fatigue/dynamic loads, or seismic cases with specific approved components, follow the anchor’s ETA and the designer’s specification.
Bottom line
Filling the annular gap is essential — but a dedicated kit is not. The anchor’s own adhesive does the job, and the open, visible method delivers the same engineering result while being cheaper, simpler and, above all, inspectable by eye. Keep the approved kit for the specific cases where a specification or ETA demands it.