

A Dangerous Deception in the Adhesive Market: Selling Epoxy-Acrylate as Epoxy
12 בJuly 2026
The Watertightness of Chemical Adhesives and Their Use in Underwater Applications
12 בJuly 2026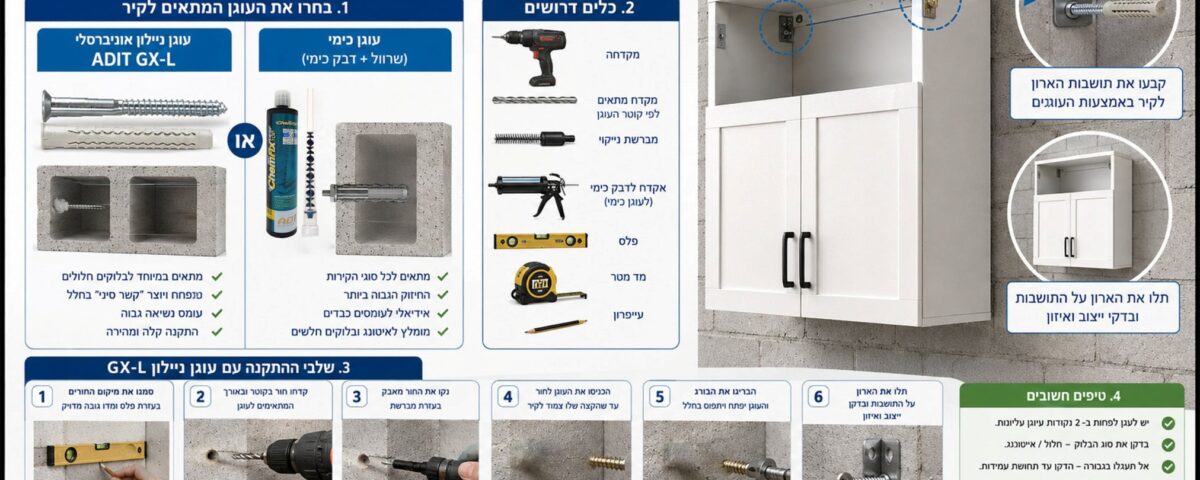
Hanging a Cabinet on a Block Wall with Plugs — A Professional Installation Guide
Hanging a wall cabinet is a task that demands precision, the right tools and an understanding of the substrate you are working on. Using the wrong technique or anchor can damage the wall and even bring the cabinet down. Here is a detailed engineering guide covering the stages, professional tips and safety points needed for a perfect, stable installation on blocks and Ytong.
In short
The plug type is the most critical factor in load capacity. For a hollow block, use a spreading/knotting plug such as the GX-L; for Ytong, the same universal plug drilled 1 mm undersize for a tight grip; and for very heavy cabinets, move to chemical anchoring with a mesh sleeve. Always drill blocks in rotation-only mode (no hammer), clean the hole from dust, spread the load over 4–6 anchors with a hanging rail, and check for pipes and wiring before drilling.
1. Choosing the right plugs: the basis for cabinet stability
The plug type is the most critical component affecting load-bearing. The right choice depends directly on the material the wall is made of.
Anchoring in a hollow block (standard)
In hollow block walls, the anchor must cope with thin, fragile internal partitions. You must use anchoring solutions for blocks with a dedicated spreading or knotting mechanism.
The leading solution: the GX-L plug
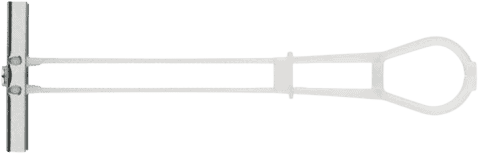
The best and most reliable plug available today in Israel for this purpose is the GX-L. As the screw is driven, this plug expands and forms a wide “knot” inside the empty cavity of the block, ensuring a firm mechanical lock and maximum resistance to pull-out, even when the substrate itself is weak.
Anchoring in a Ytong block (aerated concrete)
Ytong block is characterised by a fragile, aerated texture. You can use the same universal plugs (such as the GX-L) in 10 mm diameter.
Professional tip to increase the grip: to compensate for the fragility of the Ytong, it is recommended to use a drill bit 1 mm smaller than the plug diameter (for example, a 9 mm bit for a 10 mm plug). Drill with no vibration and insert the plug with light hammer taps. The peripheral pressure created will significantly boost the anchoring force.
Anchoring very heavy cabinets (chemical anchoring systems for blocks)
For exceptional loads (such as kitchen cabinets loaded with dishes, or heavy bookshelves) installed on a block substrate, it is strongly recommended to move to chemical anchoring for blocks. This is a two-part adhesive injected into the hole that forms a powerful polymer anchor.
2. The equipment needed for a professional installation
Preparing your tools in advance will save frustration and ensure maximum precision:
- Drill / hammer drill: fitted with a masonry bit (except for ceramic, which needs a dedicated bit) matching the plug diameter exactly.
- Spirit level / laser level (mandatory): the only way to ensure the cabinet is installed straight and perfectly.
- Screwdriver / wrench: according to the screw head type (Phillips, hex, Torx).
- Builder’s pencil and rubber mallet: for marking the drill holes and gently inserting the plugs without damaging the plastic.
- Vacuum cleaner: to remove drilling dust from the holes (especially important for chemical anchoring).
3. The work stages — full step-by-step (installation with mechanical plugs)
Step 1: planning, measuring and marking
Set the desired cabinet height, taking into account comfort of use and the clearance needed for work surfaces beneath it. Hold the cabinet (or its hanging rail) to the wall. Place the level on the top of the cabinet, and once you have confirmed it is perfectly balanced, mark the centres of the holes through the hanging brackets with the pencil. Tip: get another person to support the cabinet while marking.
Step 2: correct, accurate drilling
Hold the drill at exactly 90 degrees to the wall to avoid inserting screws crooked. Drill the holes to a depth about 10 mm greater than the plug length.
Critical tip: drilling in blocks and Ytong for a mechanical plug
When drilling in a hollow block or Ytong to install a mechanical plug, you must drill in rotation-only mode and turn off the hammer (vibration) mode on the drill. The vibration breaks and shatters the block’s delicate internal partitions, leaving a “torn”, oversized hole that stops the plug gripping the substrate.
Step 3: cleaning and inserting the mechanical plugs
Vacuum the drilling dust from the holes (trapped dust reduces the plug’s friction force). Insert the plugs into the holes with your fingers. If they resist, tap them lightly and gently with a mallet (preferably a rubber one) until the plug collar is flush (completely flat) with the wall.
Step 4: hanging and fixing on the mechanical plugs
There are two main methods for hanging the cabinet:
- Using a hanging rail (a metal/timber batten): the recommended, easiest method for heavy cabinets. Screw the hanging rail to the wall (which lets you spread the load over many anchors and level it easily). Then simply “hang” the cabinet on the rail and lock it with the cabinet clips.
- Direct hanging: hold the cabinet to the wall (preferably resting it on a temporary support), pass the screws together with wide washers through the holes in the cabinet’s back into the plugs, and tighten well. The washers prevent the screw sinking into the cabinet’s back (usually made of thin board).
Step 5: final check
Place the level on the cabinet again to confirm it has not shifted during tightening. Apply a little controlled physical force, pulling the cabinet down and forward, to verify there is no free movement between the cabinet and the wall. Only after confirming complete stability can you start loading the cabinet with equipment.
4. The work stages for chemical anchoring in blocks — full step-by-step
An important note about blocks in Israel
Block quality in Israel varies significantly from manufacturer to manufacturer, and even between different projects. Rupture tests show that chemical anchoring in a block can provide loads ranging over a huge span of 400 to 1,000 kg, all depending on the block’s wall thickness. In sensitive projects, it is recommended to carry out a pull-out test on site before starting work.
Step 1: planning, measuring and marking
Set the desired cabinet height and mark the hole centres exactly as in mechanical installation. Tip: get a second person to support the cabinet while marking, and check in advance that you have a continuous working window (including the adhesive’s curing time) before you open the chemical adhesive pack.
Step 2: drilling the hole for a chemical anchor
Hold the drill at exactly 90 degrees to the wall. In chemical anchoring for blocks, the hole diameter is significantly larger than the equivalent mechanical plug, since it must contain the nylon mesh/sleeve and the volume of adhesive (usually between 12 and 20 mm, depending on the load and the diameter of the bolt or threaded rod).
Critical tip: drilling in blocks for chemical anchoring
Here too, you must drill in rotation-only mode and turn off the hammer (vibration) mode, so as not to shatter the block’s internal partitions. However, unlike a mechanical plug, chemical anchoring with a mesh works well even when an internal cavity is formed in the block, because the adhesive creates a full polymer casting and does not depend only on peripheral pressure from the block wall.
Step 3: cleaning the hole and inserting the nylon mesh
Vacuum the drilling dust well from the hole (trapped dust can harm the adhesive’s grip on the block walls). Push in the nylon mesh/sleeve suited to chemical anchoring in blocks until it fully enters the depth of the hole. The mesh’s role is to stop the adhesive draining into the deep cavities of the block, and to concentrate it around the bolt to form a rigid casting. Tip: it is sometimes easier to inject the adhesive into the mesh before inserting it into the wall.
Step 4: injecting the chemical adhesive and inserting the threaded rod
Inject the two-part chemical adhesive into the mesh, from the inner end outward, until it is filled. Insert the threaded rod (or bolt) into the adhesive-filled mesh with a gentle twisting motion. This motion ensures the adhesive fully wraps the threads and prevents air pockets.
Step 5: curing time, hanging and final check
Critical: wait for the adhesive to fully dry and cure (usually about 60 minutes, per the adhesive manufacturer’s instructions and the working temperature) before you apply any load to the anchor. Unlike a mechanical plug that is ready for use immediately, chemical anchoring in blocks reaches its full strength only after the curing time has fully elapsed. Only then hang the cabinet (by the hanging-rail method or direct hanging, as described in step 4 for mechanical anchoring above), tighten the nuts, and place a level on the cabinet for a final check before loading it with equipment.
5. Safety points you must not ignore
- Pipe hazard: before any drilling, and especially in kitchen and bathroom areas, you must verify there are no water pipes or electrical lines running in the drilling path inside the wall. Use a dedicated metal/pipe detector.
- Conservative load distribution: never skimp on anchor points when it comes to heavy cabinets. Spreading the load over 4 or 6 quality plugs (via a hanging rail) will significantly reduce the stress on each individual plug and prevent a block partition breaking under a concentrated load.
Common questions (FAQ) — hanging cabinets and anchoring in blocks
What do you do if the hole came out too wide and the plug spins “in the void”?
A situation where the plug is free in the hole is dangerous, since it will not open and lock properly. The cause is usually using a hammer drill (vibration) in a hollow block, which shattered the partition. The quick solution is to switch to a larger universal plug (if there is room) or drill a new hole in a different position. Alternatively, the strongest solution is to move to chemical anchoring in blocks with a mesh, which will fill and re-cast the ruined cavity.
Can you hang a heavy kitchen cabinet on an old, crumbling block wall?
Yes, but not with a standard plastic plug. Crumbling walls require stabilising the substrate from within. It is recommended to use chemical anchoring for blocks with a mesh sleeve added. The adhesive will spread beyond the sleeve, seep into the crumbling areas, harden, and form a strong polymer-concrete mass that the bolt grips.
How do I choose the drill diameter versus the plug diameter?
The standard rule of thumb is that the diameters should be identical: a plug marked 10 mm should be drilled with a 10 mm bit. The exception is especially fragile walls (such as Ytong), where it is recommended to drill 1 mm undersize to create a tight fit and positive peripheral pressure.
Why is it recommended to use a hanging rail (a metal batten) rather than direct screws?
A hanging rail offers two huge advantages: the first is weight distribution — the rail is connected to many anchor points along the wall, unlike direct hanging which loads the entire cabinet weight onto 2 or 4 points. The second is levelling accuracy: it is far easier to level and screw a light metal rail to the wall than to hold a whole cabinet in the air, level it and screw it at the same time.
Sources
- ADIT GX-L universal plug and chemical anchoring (mesh sleeve) technical data.
- General field guidance on cabinet installation in hollow block and Ytong (drilling, cleaning, curing, load distribution).